Quick Guide to Insulation Installation Success:
- Check Local Codes: Verify the required R-value and vapor barriers for your area.
- Seal Gaps: Ensure no air leaks in the spaces you plan to insulate.
- Measure Correctly: Know the width between joists or studs and the correct thickness needed.
- Select the Right Type: Decide between faced and unfaced insulation based on your needs.
Getting insulation right is more than just a way to keep your home warm in the winter and cool in the summer. It’s about improving energy efficiency, slashing your utility bills, and making a positive impact on the planet. Whether you’ve faced challenges with insulation installation in the past or you’re a first-timer aiming for success, this guide is crafted for you.
Insulation is your unseen hero, working tirelessly behind the scenes to enhance comfort and efficiency in your home or business. Choosing the right insulation means not only will you save money on energy bills, but you’ll also contribute to a healthier environment by reducing your carbon footprint. If you’re in NY or NJ, understanding the local climate’s demands and incorporating sustainable practices can lead you to find the perfect insulation partner for your needs.
To ensure you’re on the path to insulation success, consider factors like local building codes, the importance of sealing any gaps, and selecting the appropriate type of insulation. Whether it’s roll, batt, blown-in, or spray foam, each has its place, and knowing which suits your situation can make all the difference.
Understanding Insulation Types
When it comes to insulation installation, picking the right type of insulation is crucial. Here’s a simple breakdown of the most common types: Fiberglass, Mineral wool, Spray foam, and Foam board.
Fiberglass
- What it is: Made from fine glass fibers.
- Pros: Affordable, easy to install for DIY projects, good for reducing energy costs.
- Cons: Can irritate skin and lungs if not handled with protective gear.
- Best for: Attics, walls, and areas that don’t require a high level of moisture resistance.
Mineral Wool
- What it is: Comprises rock or slag wool.
- Pros: Fire resistant, soundproofing capabilities.
- Cons: More expensive than fiberglass and can be harder to find.
- Best for: Areas needing good sound insulation or higher fire resistance, like internal walls.
Spray Foam
- What it is: A chemical product that expands and hardens into a solid foam.
- Pros: Excellent for sealing leaks and gaps, high R-value per inch.
- Cons: Generally requires professional installation; more expensive.
- Best for: Hard-to-reach areas, around wiring and plumbing, or in spaces where air sealing is crucial.
Foam Board
- What it is: Rigid panels of insulation.
- Pros: High insulating value for relatively little thickness.
- Cons: Must be cut to fit, can be more expensive than roll or batt options.
- Best for: Basement walls, under siding, or in any space where thin, effective insulation is needed.
Choosing the Right Type
- Energy Efficiency: Spray foam and foam board have higher R-values per inch compared to fiberglass and mineral wool, making them better at insulating but also more costly.
- Installation: Fiberglass and mineral wool can often be installed DIY, but spray foam almost always requires professional installation. Foam board can be a DIY project but might require some skill to cut and fit properly.
- Cost: Generally, fiberglass is the most budget-friendly, followed by mineral wool. Foam board and spray foam are more of an investment upfront but can lead to greater energy savings over time.
What to Consider
- Your Budget: How much are you willing to spend not just on the insulation itself but on the installation process?
- The Area Being Insulated: Is it a large open attic or a tight crawl space with lots of nooks and crannies?
- Your Main Goal: Are you looking for basic insulation, soundproofing, or do you need to create a tight seal to prevent air leaks?
No matter which type you choose, ensure it’s suited for your specific needs and climate. A well-insulated home can save you money on energy bills and make your living space more comfortable year-round.
Ready to make your home more energy-efficient? Consider your options carefully, and don’t hesitate to consult professionals when in doubt, especially for complex projects like spray foam insulation.
Preparing for Insulation Installation
Before diving into insulation installation, it’s crucial to prepare properly. This preparation can make the difference between a smooth DIY project and a frustrating experience. Let’s break it down into simple steps:
Understand Local Building Codes
First things first, check your local building codes. Different areas have different requirements for R-value (how well insulation can resist heat flow) and vapor barriers. These codes are there to ensure your home meets the minimum standards for energy efficiency and safety. Ignoring them could mean redoing the work later, so it’s worth a quick check at your local building department or online.
Seal the Gaps
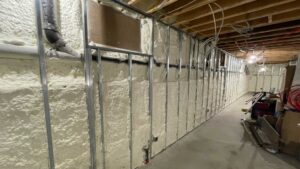
Next, you’ll want to seal any gaps that let in unconditioned air. Look around for places where plumbing, ductwork, or wiring enter the insulated space. A can of Do-It-Yourself Spray Foam Insulation can be a lifesaver here. Also, don’t overlook crawlspaces and basements; cracks in the foundation can undermine your insulation efforts.
Measure Twice, Cut Once
Measuring is key. For floors or attics, measure the distance between joists; for walls, measure the distance between studs. This will help you buy insulation that fits just right, reducing waste and ensuring effective coverage. If you’re insulating framed walls, the thickness of your wall studs will dictate the thickness of the insulation needed.
Choosing Faced vs. Unfaced
Now, decide between faced and unfaced insulation. Faced insulation has a vapor retarder, which is great for preventing moisture buildup in certain climates. Unfaced is better if you’re adding insulation to existing insulation. The right choice depends on your specific situation, so if you’re unsure, ask a professional.
The paper side of faced insulation is flammable and must not be left exposed. Always cover it with a finishing material like drywall.
Pro Tip: Use an online Roll Insulation Calculator to estimate how much material you’ll need. This can save you time and money by preventing unnecessary trips back to the store.
By following these steps, you’re laying a solid foundation for your insulation project. Whether you’re tackling an attic, basement, or the walls of your home, preparation is key to success. With the right groundwork, you’ll be ready to move on to the actual installation, ensuring your home is cozy, comfortable, and energy-efficient.
Next, we’ll dive into the step-by-step guide to installing insulation, making sure you have all the information you need to succeed, even if you’ve faced challenges before.
Step-by-Step Guide to Installing Insulation
Insulation installation doesn’t have to be daunting. By following a simple, step-by-step process, you can ensure your home is well-insulated, leading to increased comfort and energy savings. Here’s how to do it:
Cutting and Fitting Insulation
Tools You’ll Need:
– Utility knife
– Straightedge (like a ruler or a level)
Steps:
1. Measure the space where you’ll be installing the insulation. Use your straightedge for a straight line and a tape measure for accuracy.
2. Cut the insulation to size with your utility knife. Place the straightedge along the line you need to cut, and press firmly with the knife. It might take a few passes to cut through.
3. Fit the insulation into the space. It should be snug but not compressed. Compression can reduce the insulation’s effectiveness.
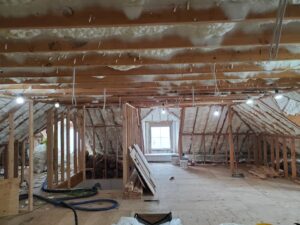
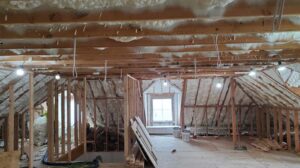
Installing in Attics
Materials:
– Roll or batt insulation
– Staple gun (for faced batts)
Steps:
1. Start at the far end of the attic and work back toward the attic access. This prevents you from stepping on or compressing the insulation you’ve just laid down.
2. Roll out the insulation between the joists. If you’re using faced insulation, make sure the vapor barrier (the faced side) is facing down toward the living space.
3. Staple the flanges of faced batts to the sides of the joists. This helps hold the insulation in place and maintains its effectiveness.
Installing in Walls
Materials:
– Roll or batt insulation
– Staple gun (for faced batts)
Steps:
1. Measure the height between studs and cut your insulation to fit these dimensions.
2. Place the insulation between the studs. For faced insulation, the vapor barrier should face the interior of the home.
3. Secure the insulation by stapling the flanges of faced batts to the inside edges of the studs.
Special Considerations
- Vapor Barriers: In most climates, faced insulation should have the vapor barrier facing the interior of the home to prevent moisture from entering the wall cavity. However, check your local building codes for specific recommendations.
- Obstacles (Wiring, Plumbing): When you encounter obstacles like wiring or plumbing:
- Cut the insulation to fit around these obstacles carefully.
- Split the insulation if necessary, placing half behind and half in front of pipes or wires.
- Avoid compressing the insulation, as this reduces its R-value and effectiveness.
Insulation installation is about precision and care. By taking your time and following these steps, you can effectively insulate your home, improving comfort and reducing energy bills. Whether you’re tackling an attic, walls, or dealing with special considerations like vapor barriers and obstacles, the key is to ensure the insulation fits well and maintains its R-value for maximum effectiveness.
If you’re unsure about tackling spray foam insulation, consider reaching out to a professional like Spray Foam Insulation USA. For simpler projects involving fiberglass or mineral wool, a DIY approach can be both rewarding and cost-effective.
Next, we’ll explore the differences between DIY and professional insulation installation, helping you decide which route is best for your project.
DIY vs. Professional Installation
Deciding whether to take on insulation installation yourself or call in the pros is a big decision. Let’s break it down to help you make the best choice for your home and your wallet.
When to DIY
DIY insulation projects can be a good way to save money, especially if you’re working with materials like fiberglass or mineral wool. These materials are generally more forgiving and easier to handle, making them suitable for those who want to give insulation installation a try.
- Fiberglass: It’s available in batts and rolls that can be easily cut to size with a utility knife and fit into place between studs and joists. It’s a good option for attics and walls in unfinished rooms.
- Mineral Wool: Similar to fiberglass, mineral wool is also easy to cut and install. It has the added benefits of being fire-resistant and absorbing sound, which makes it great for interior walls.
For these materials, a DIY approach can work well if you’re comfortable following safety guidelines, such as wearing protective gear and ensuring your space is properly ventilated.
When to Call a Professional
Some insulation projects are best left to professionals, especially when dealing with spray foam insulation. Spray Foam Insulation USA specializes in these types of installations, offering expertise that can ensure the job is done right and efficiently.
- Spray Foam Insulation: This type requires special equipment and expertise to install correctly. Spray foam expands to fill cracks and gaps, providing an excellent air barrier as well as insulation. However, incorrect application can lead to problems like uneven insulation, wasted material, and even structural damage.
- Complex Projects: If your insulation project involves hard-to-reach areas, requires the removal of old insulation, or if you’re unsure about the correct R-value needed for your climate, it’s best to consult with professionals. They can assess your needs, recommend the best insulation type, and ensure it’s installed for maximum efficiency and safety.
Spray Foam Insulation USA is a trusted provider for these more complex and technical projects. Their expertise not only ensures that the insulation is installed correctly but also that it’s done in a way that maximizes energy efficiency and minimizes risks.
In conclusion, for straightforward projects involving fiberglass or mineral wool, a DIY approach can be a great way to improve your home’s energy efficiency on a budget. However, for more complex projects or when using spray foam insulation, it’s wise to invest in professional installation. Not only will this save you time and potential frustration, but it will also ensure your home is insulated safely and effectively, leading to long-term savings and comfort.
Next, we’ll answer some frequently asked questions about insulation installation, providing you with even more insights to help you with your project.
Frequently Asked Questions about Insulation Installation
When it comes to insulation installation, there are always a few questions that pop up more often than others. Let’s tackle these head-on to give you a clearer path forward.
What is the labor cost to install insulation?
The cost of installing insulation can vary widely based on several factors including the type of insulation, the size of the area to be insulated, and the complexity of the installation. For basic materials like fiberglass or mineral wool, labor costs might be lower, especially if it’s a straightforward job like laying batts in an attic.
However, for more complex installations, such as spray foam applied by professionals like Spray Foam Insulation USA, the cost can be higher. This is due to the specialized equipment and expertise required. Always get a detailed quote upfront to avoid surprises.
Can I install insulation myself?
Yes, in many cases, you can install insulation by yourself. Simple projects involving fiberglass or mineral wool in accessible spaces like an attic are quite doable for the DIYer. Remember to wear protective gear, measure accurately, and follow all safety guidelines.
For spray foam insulation, though, it’s recommended to go with professionals. The application process involves chemical reactions and requires precise control to ensure effectiveness and safety. A poorly done job can lead to gaps in insulation, reduced energy efficiency, and even structural issues.
How do you install insulation between studs?
Installing insulation between studs is a common project, especially for unfinished walls. Here’s a quick guide:
-
Measure the Space: Before purchasing insulation, measure the distance between studs and the height of the wall to determine how much material you’ll need.
-
Choose Your Insulation: Consider the recommended R-value for your area and whether you prefer faced or unfaced insulation. Faced insulation has a vapor barrier, which is beneficial in certain climates.
-
Cut to Fit: Use a utility knife and a straight edge to cut the insulation to the correct size. If you’re working with batt insulation, it might come in pre-cut lengths that fit standard stud spacing.
-
Fit Around Obstacles: For wiring or plumbing that runs through your wall, you may need to cut the insulation to fit around these obstacles. Ensure the insulation fits snugly but is not compressed.
-
Secure the Insulation: For faced insulation, you can staple the flanges to the inside or face of the studs. Unfaced insulation can be friction-fitted into place.
The key to effective insulation is to cover the entire area without leaving gaps. Even small gaps can significantly reduce the insulation’s effectiveness.
By keeping these FAQs in mind, you’re better prepared to tackle your insulation installation project. Whether you decide to DIY or call in the pros like Spray Foam Insulation USA, understanding these basics will help ensure a smoother process and more effective insulation for your home.
Conclusion
Energy Savings and Comfort Improvement
Embarking on an insulation installation project is not just about ticking a box on your home improvement list; it’s about making a long-term investment in your home’s energy efficiency and comfort. Proper insulation, especially when done with high-quality materials and techniques, can lead to significant energy savings. By minimizing the loss of heat in the winter and keeping your home cooler in the summer, you’re not just saving on energy bills—you’re also contributing to a more sustainable future.
But the benefits don’t stop at your wallet. Imagine living in a home that maintains a comfortable temperature year-round, where cold drafts and overheating are things of the past. This level of comfort is not a luxury but a reachable goal with the right insulation.
Spray Foam Insulation USA
When it comes to insulation installation, choosing the right partner is crucial. At Spray Foam Insulation USA, we understand the importance of not just any insulation, but the right insulation for your specific needs. Our expertise in spray foam insulation offers a versatile and effective solution that fits a wide range of applications, from attics to crawl spaces.
Choosing us means opting for a team that values your comfort and energy efficiency as much as you do. We are committed to providing insulation solutions that not only meet but exceed your expectations. Our approach is tailored to your home’s unique requirements, ensuring optimal performance and longevity of your insulation.
In Conclusion
The journey to a more energy-efficient and comfortable home is an important one, and it’s clear that insulation plays a pivotal role. With the right information, materials, and professionals by your side, achieving these goals is not just possible—it’s inevitable.
Insulation installation is more than just a home improvement project; it’s an investment in your home’s future and in the planet’s sustainability. Let us at Spray Foam Insulation USA help you make that investment count. Reach out to us today and take the first step towards a more energy-efficient and comfortable home.