Attic Insulation Installation: If you’re looking to enhance your home’s energy efficiency, reduce energy bills, and improve year-round comfort, then understanding attic insulation installation is crucial. This simple upgrade can significantly impact your living environment and energy consumption.
Attic insulation serves a dual purpose: it keeps your home warm in the winter and cool in the summer, leading to substantial energy savings. By maintaining a more consistent indoor temperature, your HVAC system doesn’t have to work as hard, which means less wear and tear and extended equipment life. Moreover, a well-insulated attic contributes to a comfortable living environment, preventing the infiltration of extreme outdoor temperatures and noise.
When considering attic insulation, choose suitable materials and follow best practices for installation to maximize benefits. Properly installed insulation not only improves thermal efficiency but also contributes to moisture control and air quality, which are critical for both comfort and health.
In the following sections, we’ll delve deeper into the types of insulation available, best practices for installation, and common pitfalls to avoid. Whether you’re a seasoned DIYer or considering professional installation, this guide will provide you with the necessary knowledge to ensure successful attic insulation.
Understanding Attic Insulation
When planning for attic insulation installation, it’s crucial to understand the different types of insulation, their R-values, the importance of a vapor barrier, and the materials used. This knowledge ensures you choose the right options for your home, leading to better energy efficiency and comfort.
Types of Insulation
-
Fiberglass Batt Insulation: This is the most common type, known for its convenience and cost-effectiveness. It comes in rolls or batts and fits easily between attic joists.
-
Loose-fill Insulation: Made from materials like fiberglass or cellulose, it is blown into place, filling nooks and crannies, making it ideal for attics with irregular joist spacing.
-
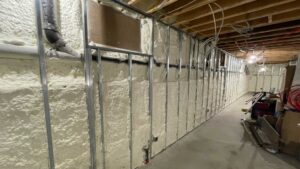
Spray Foam Insulation: Provides excellent air sealing and moisture protection. It expands to fill gaps, making it perfect for complex attic spaces. This type is particularly effective in preventing heat transfer and is highly recommended for attics that also need an air barrier.
R-Value
- What is R-Value? R-value measures the insulation’s ability to resist heat flow. The higher the R-value, the better the insulation’s effectiveness.
- Why it Matters: Choosing insulation with the appropriate R-value for your climate zone is crucial. For example, in colder regions, a higher R-value is recommended to retain heat within the home.
Vapor Barrier
- Purpose: A vapor barrier prevents moisture from passing through the insulation, which is essential to prevent mold growth and material degradation.
- Installation: It should be installed closest to the warm side (interior) of the insulation layer to effectively block moisture from entering the insulated area.
Insulation Materials
- Fiberglass: Widely used due to its fire resistance and soundproofing abilities.
- Cellulose: Made from recycled paper products, offering a greener alternative with good soundproofing.
- Mineral Wool: Known for its fire resistance and soundproofing capabilities.
- Spray Foam: Excellent for sealing air leaks and providing high R-values.
Selecting the right type of insulation involves considering your specific needs such as climate, attic structure, and whether the attic is finished or unfinished. Each material has its strengths, and the choice often depends on balancing cost, effectiveness, and environmental preferences.
In the next section, we’ll cover how to prepare your attic for insulation, including safety measures and how to address common issues like air leaks and asbestos. This preparation is key to maximizing the benefits of your new insulation.
Preparing for Attic Insulation Installation
Before diving into the installation of attic insulation, it’s crucial to prepare adequately. This preparation ensures a safe and effective upgrade to your attic’s insulation system. Let’s break down the essential steps: safety gear, measuring your attic, sealing air leaks, and checking for asbestos.
Safety Gear
Safety is paramount when working in an attic. Before starting, equip yourself with:
- Safety glasses to protect your eyes from irritating insulation particles and dust.
- Gloves to prevent cuts and irritation from materials like fiberglass.
- Dust mask or respirator to avoid inhaling insulation fibers or dust.
- Hard hat to protect your head from low beams and other hazards.
These items will help ensure that you can work comfortably and safely.
Measuring Your Attic
Proper measurement is key to purchasing the correct amount of insulation. Measure the length and width of your attic to determine the square footage. Also, measure the existing insulation’s thickness to understand how much additional insulation is needed. This step is crucial for achieving the desired R-value, which is a measure of thermal resistance.
Sealing Air Leaks
Before adding new insulation, it is essential to seal any air leaks. Common leak points include:
- Around windows and doors
- Where wires and pipes enter the attic
- Around recessed lighting fixtures
- At the attic hatch
Use caulk or foam sealants to seal these leaks. This process prevents warm or cool air from escaping, enhancing the efficiency of your insulation.
Checking for Asbestos
If your home was built before 1990, it’s crucial to check for asbestos before disturbing old insulation. Asbestos fibers can be hazardous when inhaled. If you suspect that your existing insulation might contain asbestos, do not touch it. Instead, hire a professional to test the material and, if necessary, safely remove it.
By following these preparatory steps, you can ensure that your attic is ready for a successful insulation upgrade. This preparation not only enhances safety but also maximizes the performance of your new attic insulation.
How to Install Attic Insulation
Installing attic insulation is a critical step in improving your home’s energy efficiency and comfort. Here’s a straightforward guide on how to properly install attic insulation, from choosing the right materials to the final checks.
Step 1: Choosing the Right Insulation
The type of insulation you choose will depend on your specific needs, budget, and the climate in your area:
- Fiberglass: This type is common and comes in batts or rolls. It’s relatively easy to handle and install, making it a good choice for DIY projects.
- Cellulose: Made from recycled paper, cellulose is blown into the attic, filling nooks and crannies for a tight seal.
- Spray Foam: Provides excellent air sealing and moisture protection. While it is more expensive, its high R-value and durability make it a superior choice for both cold and hot climates.
Step 2: Sealing Air Leaks
Before laying new insulation, seal all air leaks:
– Caulking: Use this around windows, doors, and any gaps in the framing.
– Foam Sealant: Ideal for larger gaps around plumbing vents and electrical boxes.
– Weatherstripping: Apply this around the attic access door to prevent air from escaping.
Step 3: Laying the Insulation
How you install insulation depends on the type you choose:
– Batt and Roll: Fit these between the joists. Do not compress; just lay it flat against the attic floor.
– Loose-Fill: Using a rented blower, spread the cellulose evenly across the attic floor.
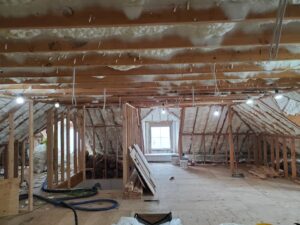
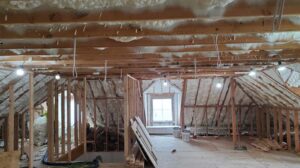
– Blown-In: Professionals typically handle spray foam, which expands to fill the space under the roof or on the attic floor.
Step 4: Insulating Attic Access
Don’t forget to insulate the attic hatch or stairs:
– Hatch Insulation: Attach rigid foam insulation boards to the attic side of the hatch using adhesive caulk.
– Stair Insulation: If you have pull-down stairs, install an insulated cover box over the stairs in the attic.
Step 5: Final Checks and Cleanup
After installation, conduct a thorough inspection to ensure there are no gaps or areas where insulation is missing. Use a vacuum to clean up any debris or loose-fill particles. Document the type of insulation used, the R-value achieved, and any other pertinent details for future reference.
By following these steps, you can effectively enhance your home’s insulation, leading to significant energy savings and increased comfort. Proper installation is key to maximizing the benefits of attic insulation.
Common Mistakes to Avoid
When installing attic insulation, a few common errors can undermine your efforts, leading to less effective insulation and potential hazards. Let’s dive into these mistakes and how you can avoid them.
Compressing Insulation
Compressing insulation is a frequent error that can significantly decrease its effectiveness. Insulation works because of the air pockets within the material which trap heat. When you compress these materials, you reduce the air pockets, lowering the insulation’s R-value (its ability to resist heat flow).
How to Avoid It:
– Lay insulation materials gently and evenly.
– Do not stack items or walk on top of the insulation.
– If storage is necessary, consider installing a platform above the insulation to avoid direct contact.
Blocking Ventilation
Proper attic ventilation is crucial to prevent moisture accumulation and regulate temperature. Blocking soffit vents with insulation can lead to moisture problems, mold growth, and reduced lifespan of roofing materials.
How to Avoid It:
– Ensure that soffit vents are not covered by insulation.
– Use baffles to maintain clear air pathways between the insulation and the roof sheathing.
– Regularly check attic vents to make sure they remain unobstructed.
Ignoring Safety Precautions
Installing attic insulation involves risks, particularly when dealing with fiberglass or spray foam. These materials can irritate the skin, eyes, and respiratory system. Additionally, the attic environment itself can pose dangers such as low visibility, extreme temperatures, and precarious footing.
How to Avoid It:
– Always wear protective gear: gloves, goggles, a mask, and long-sleeved clothing.
– Ensure the attic is well-lit during installation.
– Keep your footing on joists or temporary walkboards to avoid stepping through the ceiling.
– Stay hydrated and take breaks to avoid overheating.
By steering clear of these common pitfalls, your attic insulation installation will be more effective and safer, leading to better energy efficiency and comfort in your home. Taking the time to install insulation correctly is crucial for maximizing its benefits and the overall health of your home.
Frequently Asked Questions about Attic Insulation
When considering attic insulation installation, homeowners often have several questions. Below, we address the most common inquiries to help you better understand the process and make informed decisions.
How much insulation do I need in my attic?
The amount of insulation needed in your attic depends on several factors, including your climate zone and the existing insulation level. The Department of Energy provides recommended R-values for different regions. For example:
- Cold climates: Aim for an R-value of R-49.
- Moderate climates: R-38 is typically sufficient.
- Warm climates: R-25 is recommended.
To determine how much insulation you need to reach these R-values, measure your attic’s square footage. For batts or rolls, divide your attic’s square footage by the square footage covered by one bundle of insulation. For loose-fill, use the coverage chart provided on the bag and adjust based on the desired R-value.
Can I install attic insulation over existing insulation?
Yes, you can install new insulation over old, provided the existing insulation is dry and in good condition. If the old insulation is wet, moldy, or compressed, it should be removed and replaced. When adding new insulation, take care not to compress the existing material as this can reduce its effectiveness. For example, if you’re adding loose-fill insulation over batts, be careful to distribute it evenly without weighing down the batts underneath.
Is it cheaper to insulate your attic yourself?
DIY attic insulation can be less expensive upfront compared to hiring professionals, as you save on labor costs. However, consider the following:
- Materials Cost: You’ll need to purchase insulation, and possibly rental equipment like an insulation blower for loose-fill materials.
- Time Investment: DIY projects require time for planning, shopping, and installation. Depending on your familiarity with DIY projects, this could take a weekend or longer.
- Quality and Efficiency: Professional installers can often secure materials at a lower cost and achieve more efficient, effective installation. Mistakes in DIY installation can lead to reduced effectiveness of the insulation, potentially costing more in the long run through higher energy bills.
Before deciding, weigh the initial savings against the potential long-term benefits and costs of professional installation.
By understanding these key aspects of attic insulation, you can better plan your project and choose the approach that best meets your needs and budget. Whether you DIY or hire professionals, the goal is to enhance your home’s comfort and energy efficiency.
Conclusion
When we consider the journey of upgrading our home’s insulation, particularly focusing on attic insulation installation, the benefits extend well beyond immediate comfort. By investing in high-quality insulation, like the solutions offered at Spray Foam Insulation USA, you’re not just enhancing your living space; you’re also stepping into a realm of significant energy efficiency.
Energy Efficiency:
A well-insulated attic acts as a barrier against heat loss in winter and heat entry during summer. This thermal regulation means your heating, ventilation, and air conditioning (HVAC) system works less strenuously, reducing your energy consumption. Over time, this lowered demand translates to substantial savings on your energy bills and contributes to environmental conservation by reducing your carbon footprint. With the right attic insulation, you could see a reduction in your energy usage by as much as 20-30%, depending on various factors including the climate of your area and the existing insulation.
Home Improvement:
Beyond energy savings, the comfort of your living environment improves dramatically with proper attic insulation. No more cold drafts in winter or sweltering heat in summer—just consistent, comfortable temperatures throughout your home. Additionally, good insulation helps in noise reduction, keeping your home quieter. It also prevents potential damage from moisture and mold, which can save costly repairs and maintain the structural integrity of your home.
At Spray Foam Insulation USA, we understand that each home has unique needs. That’s why we offer tailored insulation solutions designed to provide the best in thermal resistance and air sealing. Whether you’re tackling a DIY project or seeking professional installation, our team is here to ensure that your insulation is done right the first time.
In conclusion, enhancing your attic’s insulation is more than a home improvement project—it’s a smart investment in your home’s future and sustainability. With our expert guidance and high-quality materials, your attic insulation project will lead to greater energy efficiency, enhanced home comfort, and ultimately, significant cost savings. Ready to take the next step in making your home more energy-efficient and comfortable? Contact us today for a free estimate and let us help you achieve your goals.